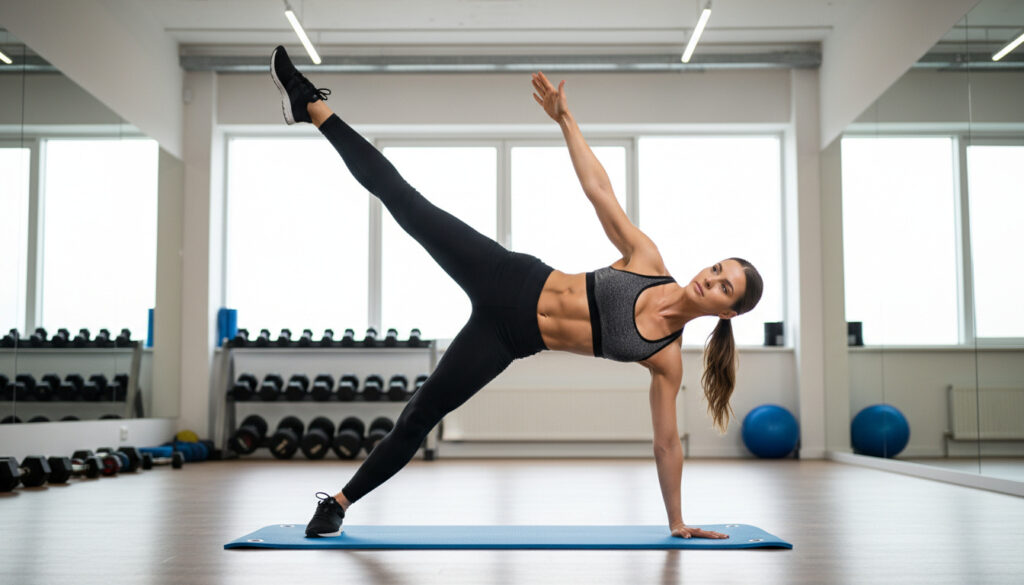
Single Leg Glute Bridge – Proper Form and Key Benefits
The single-leg glute bridge serves as a fundamental unilateral movement for developing posterior chain strength and hip stability. Unlike bilateral variations, this exercise isolates each side independently, exposing imbalances that often remain hidden during double-leg movements.
Requiring no equipment and minimal space, the movement translates directly to athletic performance and daily functional capacity. It targets the gluteus maximus while engaging stabilizing muscles throughout the core and lower body, making it a staple in both rehabilitation protocols and strength training programs.
Understanding proper execution ensures you maximize glute activation while protecting the lower back from compensatory stress.
How to Do a Single Leg Glute Bridge
- Requires no external loading to achieve significant glute activation
- Exposes left-right asymmetries in hip strength and stability
- Functions as both activation drill and primary strengthening movement
- Teaches core bracing mechanisms transferable to heavy compound lifts
- Allows precise foot positioning adjustments to shift muscle emphasis
- Serves rehabilitation purposes for lower back and hip pathologies
- Demands controlled descent to maintain eccentric tension
| Fact | Details | Why It Matters |
|---|---|---|
| Starting Position | Supine, feet flat near glutes, chin tucked, arms driving into floor | Ensures neutral spine alignment and upper body stability |
| Core Engagement | Ribs pulled down toward pelvis | Prevents lumbar hyperextension during hip lift |
| Non-Working Leg | Knee bent at 90 degrees, not extended | Maintains exercise focus on glutes rather than balance compensation |
| Tempo | Controlled descent after hip extension | Maximizes time under tension and reduces injury risk |
| Volume (Activation) | 2-4 sets of 5-15 reps | Prepares glutes without excessive fatigue before compound movements |
| Volume (Strength) | Sets of 5-10 reps with added resistance | Builds hip extension power when performed post-workout |
| Foot Distance | Closer to glutes for glute emphasis, further for quad engagement | Allows targeting of intended muscle groups based on individual needs |
| Alignment Cue | Shoulders, hips, and working knee move as one unit | Ensures proper force transfer and spinal safety |
Step-by-Step Execution
Lie on your back with knees bent and feet flat on the floor, positioned close to your buttocks so your shins remain nearly vertical. Tuck your chin toward your chest and actively drive your arms into the floor with bent elbows to create upper body tension.
Tighten your core by pulling your ribs down toward your pelvis. Before attempting the single-leg version, practice pushing through both feet to raise your hips to full extension while squeezing your glutes. Maintain the “ribs down” position to avoid hyperextending your lower back.
Raise one leg off the floor and bend that knee to 90 degrees. Keep the non-working leg bent rather than extended, as straightening it creates an unnecessary balance challenge that shifts focus away from glute activation.
Drive through the foot that’s flat on the floor to raise your hips upward. Your shoulders, hips, and working knee should align at the top of the movement. Lower your hips back to the floor with controlled speed to maintain tension throughout the eccentric phase.
Foot Positioning and Setup Adjustments
If you feel the exercise primarily in your hamstrings rather than glutes, move your feet closer to your buttocks. Conversely, if you feel excessive tension in your quadriceps or knees, move your feet further away. Experiment with toe direction and stance width until you achieve optimal glute engagement.
Muscles Worked and Benefits of the Single Leg Glute Bridge
Primary and Secondary Muscle Activation
The gluteus maximus serves as the primary muscle responsible for hip extension during this movement. The hamstrings work synergistically to lift the hips, while the core, hip flexors, and knee extensors provide stabilization. Additional activation occurs in the spinal stabilizers and back muscles, which work to maintain neutral alignment throughout the lift.
Functional Advantages
The exercise tones and sculpts the glutes and thighs while strengthening core and back muscles. It stabilizes the spine through anti-rotation demands and functions effectively as both a strength-building exercise without weights and a high-rep burnout movement for lower-body workouts.
To ensure you’re targeting the glutes rather than turning the movement into a balance challenge, keep the non-working leg bent at 90 degrees rather than fully extended. This modification maintains focus on hip extension strength instead of equilibrium.
Single Leg Glute Bridge vs Regular Glute Bridge
The single-leg variation introduces significant instability compared to the double-leg version. This demands increased core bracing and upper body tension to prevent the hips from tilting or twisting during the lift.
While the bilateral bridge allows heavier loading due to greater stability, the unilateral version provides superior glute activation per leg and reveals strength discrepancies between sides. The exercise requires driving through the elbows and maintaining a “ribs down” position to control rotational forces that don’t exist in the standard two-leg version.
Common Mistakes, Reps, Sets, and Progressions
Form Errors to Avoid
One of the most common technical failures involves hips that do not stay level during the movement. Allowing the pelvis to drop or rotate indicates insufficient core stability on the working side. Additionally, improper foot positioning can shift emphasis away from the glutes, turning the exercise into a balancing act rather than a targeted strengthening movement.
Beginner-Friendly Modifications
Several regressions build the requisite stability and strength for the full movement. The standard glute bridge keeps both feet on the floor, eliminating unilateral instability while teaching the hip extension pattern. Reducing the range of motion by limiting how far you lift the hips decreases intensity for those recovering from injury or building baseline strength.
The glute march involves bridging up with both legs, then raising one leg at a time like marching while keeping hips elevated. The two-up, one-down variation requires bridging up with both legs, then raising one leg and lowering your body with the other, building eccentric control. The B-stance variation positions your non-working leg forward until its heel aligns with the toes of your working foot, providing minimal support while keeping most weight on the working leg.
Advanced Variations
Advanced practitioners can place the working foot on an elevated surface such as a yoga block or step stool to increase range of motion. Holding a weight near the midsection or adding resistance with a barbell, dumbbell, kettlebell, or plate over the hips increases mechanical load. Isometric holds at the top position rather than continuous reps build static strength and endurance.
Programming Guidelines
For training preparation, perform 2-4 sets of 5-15 reps to activate glutes without excessive fatigue. When using the movement as a primary strength exercise with external resistance, sets of 5-10 reps prove appropriate. Individual capacity varies significantly based on training history, as some people can perform many reps while others fatigue quickly.
Allowing the hips to drop or twist during the single-leg variation indicates insufficient core stability. If you cannot maintain level hips throughout the movement, regress to the B-stance or standard glute bridge until you develop adequate control.
Rep ranges vary widely by individual strength levels. Some athletes can perform high repetitions while others fatigue quickly—adjust volume based on form quality rather than arbitrary numbers.
Progression Timeline: Building Proficiency From Floor to Load
- Foundation: Master the standard glute bridge with both feet planted to establish the basic hip extension pattern and core bracing sequence.
- Alternating Stability: Practice the glute march, maintaining elevated hips while alternating leg lifts to introduce unilateral demands.
- Eccentric Control: Progress to the two-up, one-down technique to build strength and control during the lowering phase on a single leg.
- Partial Assistance: Advance to the B- stance position, utilizing minimal assistance from the non-working heel while maintaining proper hip alignment.
- Full Unilateral: Execute the complete single-leg variation with proper hip alignment and no support from the non-working side.
- External Loading: Add resistance through weights, elevation, or isometric holds for continued strength development.
What Research Confirms vs. What Remains Unclear
| Established Evidence | Uncertain or Context-Dependent |
|---|---|
| Gluteus maximus serves as the primary mover for hip extension | Optimal rep ranges for specific populations such as endurance runners versus powerlifters |
| Bent non-working leg reduces balance distraction and maintains glute focus | Precise long-term injury prevention outcomes for chronic low back pain populations |
| Foot position closer to glutes increases hamstring engagement; further placement emphasizes quadriceps | Exact timeline for progression between modification stages |
| Core bracing with “ribs down” position prevents lumbar hyperextension | Ideal weekly frequency for maximum hypertrophy versus endurance adaptation |
| 2-4 sets of 5-15 reps effectively activate glutes without excessive fatigue | Whether unilateral work translates to bilateral strength gains equally across all individuals |
Role in Training and Rehabilitation
The single-leg glute bridge functions across multiple training environments. In rehabilitation settings, it effectively activates the glutes and engages abdominal muscles, supporting recovery from lower back, hip, and hamstring injuries. The movement strengthens the core, lower back, glutes, and hamstrings without requiring external loading, making it accessible during early recovery phases.
For athletes and fitness enthusiasts, the exercise serves as a preparatory activation drill before squats and deadlifts, ensuring glute recruitment during heavier compound movements. It also fits into high-intensity interval training as a burnout movement for lower-body sessions. Educational resources like Grade 3 Math Worksheets – Free Printable PDFs with Answer Keys demonstrate how structured progression applies across different learning and training contexts.
Expert Sources and Technical Guidance
Keep the non-working leg bent rather than extended, as extending it makes the exercise unnecessarily harder and turns it into more of a balancing act.
— Onnit Academy
The number of reps may vary significantly based on individual strength, as some people can perform many reps while others can only do a few.
— Catalyst Athletics
Key Takeaways for Single Leg Glute Bridge Training
The single-leg glute bridge delivers unilateral strength development and glute activation without equipment requirements. By emphasizing proper hip alignment, controlled tempo, and appropriate progression through modified variations, practitioners can safely advance from basic movement patterns to loaded hip extension work. Whether used for rehabilitation, activation, or primary strength work, the exercise demands attention to core bracing and foot positioning to maximize benefits. For those interested in educational institutions and community resources, Craig Kielburger Secondary School – Milton High School Overview provides information on local facilities that support physical education and athletic development.
Frequently Asked Questions
Why do I feel this exercise in my hamstrings instead of my glutes?
Move your feet closer to your glutes and focus on driving through the heel. Experiment with foot distance and toe angle until you feel tension primarily in your glutes rather than the back of your thighs.
Is the single-leg version better than the double-leg glute bridge?
It provides greater instability and unilateral activation per leg, revealing asymmetries. However, the double-leg version allows heavier loading. Both have distinct applications depending on training goals.
How often can I perform single-leg glute bridges?
You can perform them daily as part of activation routines or 2-3 times weekly as strength work. Avoid excessive volume if form degrades or if you’re using them as a primary strength movement with added resistance.
Can this exercise help with lower back pain?
It may help by strengthening core and spinal stabilizers while activating glutes, but individual results vary. Consult a physical therapist if you have acute pain or specific pathologies.
Should my foot be flat or on my heel during the lift?
Keep the entire foot flat on the floor. Driving through the heel while maintaining full foot contact ensures optimal force transfer and glute recruitment without excessive knee stress.
Why does my hip drop when I lift one leg?
This indicates insufficient core stability or hip strength on the working side. Regress to the B-stance or standard glute bridge until you can maintain level hips throughout the movement.
Is this exercise suitable for runners?
Yes. The exercise improves single-leg stability and hip extension power, which translates directly to running mechanics and stride efficiency while reducing injury risk through balanced strength development.
More related posts
 Best Travel Credit Cards Canada 2026: Compare Top Cards
 Tom Holland Spider-Man Movie : Order, Replacement , Per onal Life
 Amazon Canada Online Shopping: Switch Regions, Ship & Save
 Vincent D’Onofrio Movies and TV Shows – Complete Filmography and Best Roles
 Kneecap Hip Hop Group: Real Belfast Trio, Movie & Facts
 Scott Disick: Weight Loss Admission, Relationships, Net Worth
 38 cm to Inches – Exact Conversion 14.96
 Japan Cherry Blossom Festival Cancelled: Fujiyoshida Axes 2026